
Side Dishes
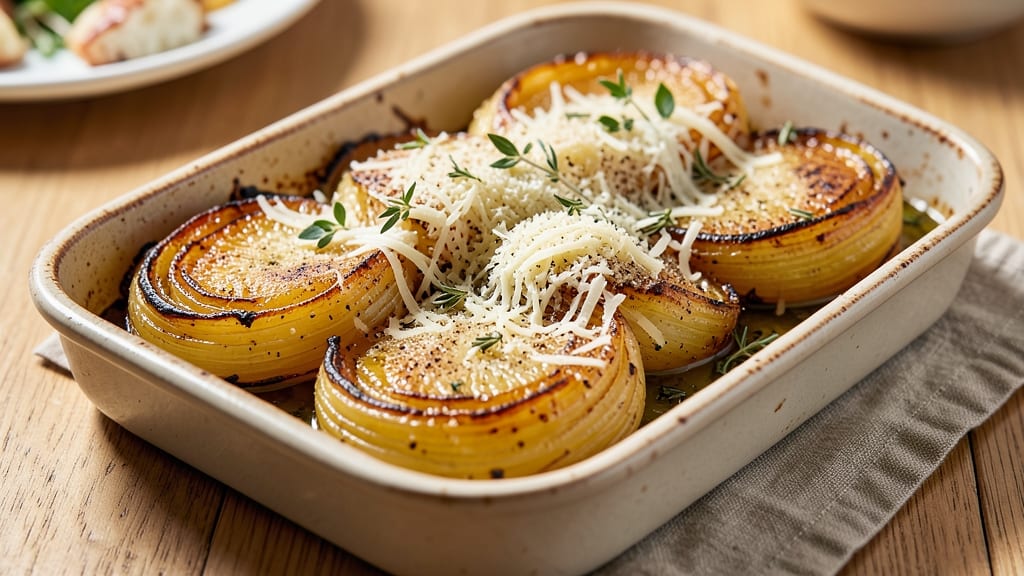
Baked onion and parmesan cheese transforms humble onions into a golden, crispy masterpiece with caramelized layers beneath. This recipe delivers restaurant-quality results with minimal effort—just 45 minutes in the oven and a handful of ingredients. The secret lies in high heat and proper layering, ensuring that crispy crown you crave without burning the bottom.
The process begins with slicing onions into even rings and baking them until tender yet still holding their shape. A sprinkle of garlic powder and salt enhances their natural sweetness, while a final blanket of grated parmesan creates that irresistible golden crust.
The contrast between the crispy top and tender, caramelized layers makes this dish unforgettable.
Perfect as an appetizer with a side of marinara or as a savory side dish alongside grilled meats, this recipe delivers a satisfying crunch and rich, cheesy flavor. The parmesan melts into a creamy, flavorful coating that ties everything together, making it a crowd-pleaser for any occasion.
For extra depth, consider adding a pinch of dried herbs like thyme or oregano to the onion rings before baking. If you prefer a crunchier texture, a light dusting of breadcrumbs before the final parmesan layer will elevate it further. Let’s get started!
Ingredients for baked onion and parmesan cheese
Crispy onions and rich parmesan create a golden, caramelized masterpiece with minimal ingredients.
| Ingredient | Amount | Notes |
|---|---|---|
| Yellow Onions 🧅 | 3 large | Sliced into 1/4-inch rings |
| Parmesan Cheese 🧀 | 1 cup | Freshly grated from block |
| Garlic Powder 🧄 | 1 tsp | For enhanced flavor |
| Salt 🧂 | ½ tsp | Kosher or sea salt |
| Olive Oil 🫒 | 1 tbsp | For brushing onions |
| Dried Thyme 🌿 | ¼ tsp | Optional for extra depth |
| Breadcrumbs 🍞 | ¼ cup | Panko for extra crunch |
| Black Pepper 🌶️ | ¼ tsp | Freshly ground preferred |
The onions are the star—choose large yellow onions with firm, dry skins for even baking. Trader Joe's or Whole Foods often carry the best quality, but any grocery store will do. Slice them into even 1/4-inch rings—this ensures consistent crispiness. Avoid onions with sprouting or soft spots, as they won’t caramelize properly. For extra flavor, a quick soak in cold water for 10 minutes removes excess sulfur compounds, making the final dish taste sweeter.
No freshly grated parmesan? Pre-grated works in a pinch, but it lacks the melt and texture. The breadcrumbs add crunch—panko is ideal, but regular breadcrumbs work too. Short on thyme? Dried oregano at half the amount gives a similar earthy note. For a richer finish, swap the olive oil for butter melted into the parmesan. The garlic powder is non-negotiable—it’s the secret to that restaurant-quality depth. If you prefer a spicier kick, add a pinch of red pepper flakes with the parmesan.
Prep the onions ahead and store them in the fridge for up to 2 days before baking. The parmesan keeps for weeks in an airtight container, while breadcrumbs stay fresh for 1 month in the pantry. Once baked, these reheat beautifully—just 5 minutes at 350°F to restore crispiness. Portion into individual servings for easy appetizer plating, or store the whole batch in the fridge for 3 days.
Why You'll Love This Recipe
- One-Pan Magic: I swear by this recipe because it’s literally one pan, one knife, and 15 minutes of active time. No chopping boards to wash, no tiny bits of onion flying everywhere—just slice those yellow onions in half, drizzle with olive oil, and let the oven do the work.
- Crispy-Creamy Obsession: That golden caramelized edge on the onions? Chef’s kiss. The garlic powder and salty parmesan melt together in the best way—sweet, sharp, and just salty enough to make you reach for seconds without even trying.
- Snack or Side: Between us, I’ve eaten this straight from the pan as a snack, tossed it into pasta, or used it to top grilled cheese. It’s the ultimate flexible player—whether you’re feeding a crowd or just me and my lazy Sunday plans.
- Budget Win: Onions and parmesan are cheap, but they feel fancy. A single block of parmesan lasts forever when you’re grating it over this, and the flavor stretches across multiple meals. Honestly? It’s my go-to for stretching dinner into leftovers without sacrificing taste.
Step-by-step instructions for baked onion and parmesan cheese
Here's how to transform simple ingredients into golden, caramelized layers with crispy tops.
Prepare the Onion Layers for Baking
Preheat your oven to 375°F and position a rack in the middle position. Take the 3 large yellow onions and carefully slice each into ¼-inch rings. I like to use a sharp chef's knife and cut through the root end first to keep the rings intact. Arrange the onion rings in a single layer on a baking sheet lined with parchment paper, slightly overlapping them in concentric circles to create your onion crown.
Brush each layer generously with the 1 tablespoon olive oil using a pastry brush, making sure every ring gets coated. This oil is crucial—it prevents drying and helps create that beautiful caramelization. Sprinkle the onions evenly with the ½ teaspoon salt, 1 teaspoon garlic powder, and ¼ teaspoon black pepper. For that extra depth, dust lightly with the ¼ teaspoon dried thyme if using. The seasoning should look like a fine, even coating over each ring.
Create the Cheesy Crust Layer
In a medium bowl, combine the 1 cup freshly grated Parmesan cheese and ¼ cup breadcrumbs. Using your hands, mix these ingredients together until the breadcrumbs are evenly distributed throughout the cheese. The texture should be crumbly but cohesive, with no dry spots. This mixture will form the crispy crown that tops your baked onions.
Once mixed, sprinkle this cheese and breadcrumb combination evenly over the top layer of onion rings. Press down gently with the back of a spoon to help it adhere. The goal is to cover about 75% of the top surface—just enough to create that golden crust without overwhelming the delicate onion layers underneath. This is where the magic happens: the cheese will melt and brown beautifully while the breadcrumbs add texture.
Bake to Golden Perfection
Place the prepared baking sheet in the preheated oven and bake for 25-30 minutes. You're looking for the top layer to turn a deep golden brown, almost mahogany in color. The onions should be tender enough that a fork slides in easily, but still hold their shape. Every 5 minutes, check the progress—ovens vary, and you don't want to overcook them into mush.
About halfway through baking, if you notice the cheese browning too quickly, tent the baking sheet loosely with aluminum foil. This prevents burning while still allowing the onions to caramelize. The final test is when the top crust is crispy to the touch and the onions underneath are soft and sweet. Remove from the oven and let rest for 5 minutes before serving—this allows the juices to redistribute and makes for easier slicing.
Serve Warm and Enjoy
Slice the onion crown into wedges and serve immediately while still warm. The contrast between the crispy cheesy top and the caramelized, tender onions is what makes this dish special. I like to serve it as a side dish with steak or chicken, but it's hearty enough to be a main course with a simple green salad.
For extra flavor, drizzle with a little more olive oil before serving or sprinkle with fresh parsley. The onions should be sweet and jammy inside with a perfect caramelized crust, while the cheese topping remains crispy and golden. This is where all the preparation pays off—each bite delivers that perfect balance of textures and flavors.
Pro Tips For Making Baked Onion And Parmesan Cheese
- Slice Thinly, Evenly: I learned this the hard way—uneven slices mean some onions burn while others stay raw. Aim for ¼-inch thickness and cut them into consistent wedges (like pizza slices). This ensures even cooking and that perfect caramelized edge everyone craves.
- Preheat Pan, Not Just Oven: Cold pans make onions sweat instead of sear. Heat your baking dish (or skillet if you’re sautéing first) over medium-high for 3-4 minutes before adding oil. The onions will hit the heat faster and develop that golden crust without sticking—no scrubbing required later.
- Skip the Crowding: Piling onions too high means steam instead of crispy edges. Arrange them in a single layer with just enough space between slices to let air circulate. If your dish is small, work in batches—trust me, the second round will taste just as good.
- Grated Cheese Matters: Freshly grated Parmesan makes all the difference here. Pre-shredded cheese has anti-caking agents that turn to rubber when baked. Use only fine grates (the kind that makes dust, not chunks) and sprinkle it right before the last 5 minutes—that’s when it melts into gooey perfection.
Common mistakes when making this dish
Uneven Onion Rings
Slicing onions into uneven rings is the #1 mistake I see. Thicker slices take longer to cook, leaving you with dry, overcooked bottom layers while the top stays underdone. Use a sharp chef’s knife and cut through the root end first to maintain even thickness—aim for ¼-inch rings every time.
If you’re nervous about consistency, invest in a mandoline slicer with a ¼-inch guide for foolproof results. 🧅
Skipping the Oil
Baking onions without oil leads to dry, flavorless rings that lack caramelization. The 1 tablespoon olive oil isn’t just for moisture—it creates a barrier that helps the onions develop that deep golden color and sweet, jammy texture.
Brush it on generously and don’t skip this step, even if your onions look juicy. Pro tip: Warm the oil slightly before brushing for even better absorption.
Overcrowding the Pan
Piling onions too high on the baking sheet causes steaming instead of browning, resulting in soggy layers. Arrange them in a single layer, slightly overlapping in concentric circles (like a crown). If you’re making a double batch, use two baking sheets instead of overloading one.
This ensures even airflow and consistent crispiness throughout. Trust me, the extra 10 minutes of prep saves you from a sad, mushy mess. 🔥
Burning the Cheese
Watching the parmesan turn golden is exciting, but burning it ruins the dish. If the top starts browning too quickly (usually after 15-20 minutes), tent loosely with aluminum foil to slow the process. Remove the foil for the last 5-10 minutes to let the cheese crisp up again.
This two-step method gives you that perfect crispy crust without bitterness. A spray bottle with water can also help—mist the foil lightly to create steam and prevent scorching.
Not Resting Before Serving
Skipping the 5-minute rest after baking might seem harmless, but it’s a game-changer. Without resting, the juices redistribute unevenly, leaving you with a dry, crumbly texture. Let the onions sit on the baking sheet while you prep your serving plate—this also makes slicing clean wedges much easier.
Patience here ensures every bite is tender, juicy, and delicious, not dry and disappointing. 💫
Using Pre-Grated Parmesan
Pre-grated parmesan contains anti-caking agents that prevent proper melting and crisping. Freshly grated parmesan is non-negotiable for that creamy, golden crust. If you’re short on time, grate your own block using a microplane or box grater—it takes just 2 minutes and makes all the difference.
The texture and flavor are night and day compared to store-bought versions. Your taste buds (and your guests) will thank you!
Nutrition facts
Frequently asked questions
Can I make this recipe with red onions instead of yellow?
Yes, but expect a slightly different flavor profile! Red onions are milder and sweeter when caramelized, but they tend to darken more quickly during baking. For best results, reduce the baking time by 2-3 minutes and watch closely after 20 minutes to prevent over-browning. The parmesan topping will still crisp beautifully, but the final dish will have a brighter hue.
How do I reheat leftover baked onion rings?
Reheat in a 350°F oven for 5-7 minutes to restore crispiness. For a quicker option, use the air fryer at 375°F for 3-4 minutes—this method works best for small batches. Avoid the microwave, as it makes the onions soggy. Always reheat covered with foil to prevent drying.
Can I use a different cheese besides parmesan?
Try pecorino romano (more pungent) or gruyère (creamy melt) for variations. For a sharper flavor, mix in ½ cup sharp cheddar—just reduce the parmesan to ½ cup to maintain balance. The key is using freshly grated cheese for that perfect crispy texture.
Is this dish gluten-free?
Not traditionally, but you can easily adapt it! Replace the breadcrumbs with gluten-free panko or crushed gluten-free crackers. For extra crunch, use almond flour instead. Just ensure all other ingredients (like garlic powder) are certified gluten-free if needed. The flavor remains rich and satisfying with these swaps.
What's the best way to serve these onion rings?
Slice into wedges and serve as an appetizer with marinara sauce** or a creamy dipping sauce. They pair beautifully with grilled meats, steak, or even as a hearty side for pasta dishes. For a complete meal, add a simple green salad or roasted vegetables. The crispy cheese topping makes them irresistible on their own!