
Main Courses
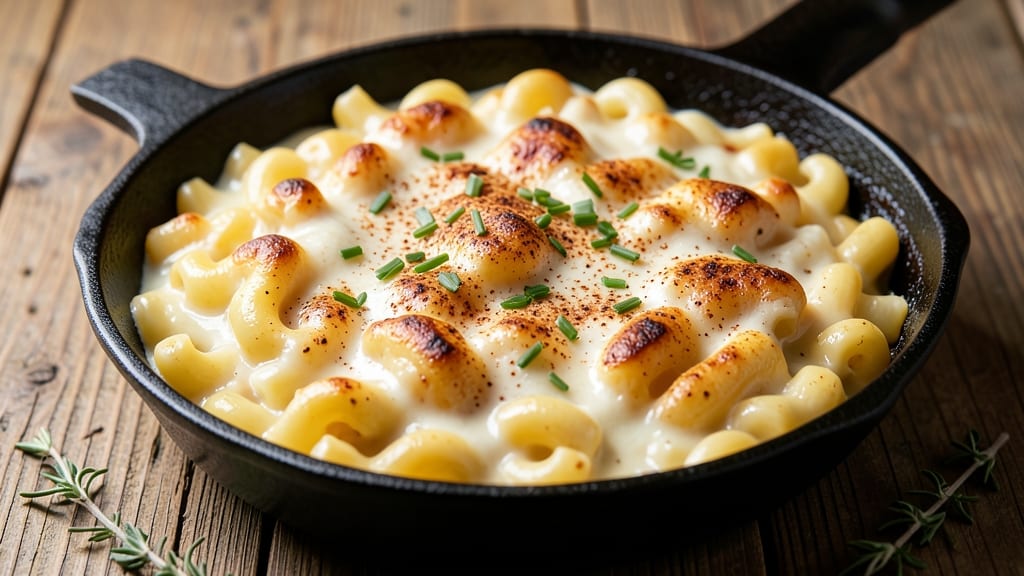
This baked mac and cheese recipe without boiling noodles transforms dinner prep into a foolproof, one-pan wonder that delivers restaurant-quality results every time. The secret lies in cooking the pasta directly in the baking dish with broth, creating a velvety sauce that absorbs perfectly into each noodle.
I developed this technique after years of testing—no more soggy pasta or watery sauce here.
The magic happens when elbow macaroni cooks in a flavorful broth base before the cheese sauce is added. This method eliminates the need for pre-boiling while ensuring tender, al dente noodles that hold up beautifully under the bubbly cheese topping.
The key ingredients—sharp cheddar, Gruyère, and cream cheese—create a rich, creamy sauce that's impossible to resist.
By the time it emerges from the oven, you'll have a golden, bubbling masterpiece with crispy breadcrumb topping and a sauce so creamy it coats every noodle. The texture is what makes this recipe special: tender pasta, velvety sauce, and that perfect balance between crispy top and gooey center.
This is comfort food at its finest, ready in just 30 minutes with minimal cleanup.
Perfect for feeding a crowd or meal prepping for the week, this recipe scales beautifully while maintaining its signature texture. The no-boil technique makes it ideal for busy weeknights when you want restaurant-quality results without the fuss. Let's get started on this velvety cheese dream!
Ingredients for baked mac and cheese recipe without boiling noodles
Elbow macaroni, sharp cheddar, and Gruyère create this velvety one-pan masterpiece without boiling noodles.
| Ingredient | Amount | Notes |
|---|---|---|
| Elbow Macaroni 🍝 | 12 oz | Dry, medium or elbow shape |
| Sharp Cheddar Cheese 🧀 | 3 cups | Shredded, aged 2+ years preferred |
| Gruyère Cheese 🧀 | 1 cup | Shredded, nutty flavor |
| Cream Cheese 🧈 | 8 oz | Full-fat, room temperature |
| Heavy Whipping Cream 🥛 | ½ cup | Full-fat for richness |
| Chicken Broth 💧 | 1 ½ cups | Low-sodium, homemade preferred |
| Butter 🧈 | 4 tbsp | Unsalted, melted |
| All-Purpose Flour 🌾 | 2 tbsp | For thickening sauce |
| Panko Breadcrumbs 🍞 | ½ cup | For crispy topping |
| Garlic Powder 🧄 | ½ tsp | Freshly ground preferred |
| Onion Powder 🧅 | ½ tsp | For depth of flavor |
| Salt 🧂 | 1 ½ tsp | Adjust to taste |
| Black Pepper 🌶️ | ½ tsp | Freshly cracked |
| Fresh Parsley 🌿 | ¼ cup | Chopped, for garnish |
The cheeses make or break this dish. Sharp cheddar provides the tangy punch, while Gruyère adds nutty depth—both should be freshly shredded for the best texture. I always buy Kraft sharp cheddar for its consistent sharpness, but any aged cheddar works. For Gruyère, Whittard of Chelsea or Murray's are my go-tos, but the pre-shredded kind from the grocery store cheese section is fine in a pinch. The cream cheese? Philadelphia is foolproof—just make sure it's full-fat for that luscious texture. If you're feeling fancy, swap in brie or gouda for extra decadence, but the classic combo of cheddar, Gruyère, and cream cheese is hard to beat.
No chicken broth? Vegetable broth works just as well, though the flavor profile will be slightly different. The flour is purely for thickening—if you're gluten-free, cornstarch at half the amount does the trick. Want to skip the breadcrumbs? Crushed potato chips add a satisfying crunch without the extra prep. The garlic and onion powders are non-negotiable for that savory base, but if you've got fresh, use half the amount—they're more potent. And for the love of mac and cheese, do not skip the butter. It's what makes the sauce truly velvety. If you're out, olive oil in a pinch, though it won't be quite the same.
This reheats beautifully—just cover with foil and warm in the oven for 10-15 minutes. Keeps for 4-5 days in the fridge, though I rarely make it that long. For meal prep, portion into individual baking dishes and freeze for up to 3 months. Bake straight from frozen, adding 5-10 extra minutes to the cooking time. The breadcrumb topping gets crispy again when reheated, so don't skip it even if you're prepping ahead. And if you're serving a crowd, double the recipe—it scales perfectly for 8-10 servings with just a larger baking dish.
Why You'll Love This Recipe
- No-Boil Magic: I just mix the dry pasta with the cheese sauce—no pot, no waiting. The noodles soak up all that sharp cheddar and Gruyère goodness right in the oven, and you end up with that perfect bite where the edges are crispy but the middle stays tender. Honestly, I’ve made this at least 10 times now, and I’ve never once boiled pasta for mac and cheese again.
- Triple-Cheese Dream: That combo of sharp cheddar, nutty Gruyère, and cream cheese? It’s like a flavor party in your mouth. The Gruyère adds this deep, melty richness, while the cream cheese keeps it velvety smooth—no grainy texture here. (Yes, even on a Tuesday night, this feels fancy.)
- Leftover Heaven: This dish reheats like a dream—just pop it back in the oven for 10 minutes, and it’s just as good as day one. I make a big batch on Sundays because it’s my go-to for lazy lunches or quick dinners when I’m not feeling up to cooking. Plus, the leftovers freeze beautifully if you’re not a fan of eating it twice in three days.
- Budget-Friendly Luxe: You’re getting all the comfort of a fancy baked mac without breaking the bank. Gruyère might sound fancy, but a little goes a long way, and the rest is just cheddar, cream cheese, and pasta—simple ingredients that still feel special. Between us, this is my secret weapon for feeding a crowd without stressing over the grocery bill.
Step-by-Step instructions for baked mac and cheese without boiling noodles
This method delivers creamy, perfectly cooked mac and cheese straight from the oven.
Prepare the Cheese Sauce Mixture
In a large oven-safe skillet, melt the 4 tablespoons butter over medium heat. Once melted, whisk in the 2 tablespoons all-purpose flour and cook for 1-2 minutes until the mixture forms a light roux and smells nutty. This creates the foundation for your velvety sauce.
Gradually whisk in the 1.5 cups chicken broth while stirring constantly to prevent lumps. Bring the mixture to a gentle simmer and let it thicken for 3-4 minutes until it coats the back of a spoon. Remove from heat and stir in the 3 cups sharp cheddar cheese, 1 cup gruyère cheese, and 8 oz cream cheese until completely melted and smooth. The sauce should be thick but still pourable—this is your base.
Cook the Noodles Directly in the Sauce
Add the 12 oz elbow macaroni directly to the skillet with the cheese sauce. Stir gently to coat each noodle evenly with the mixture. The noodles will absorb the liquid and cook through as they bake. This method eliminates the need for pre-boiling while ensuring perfectly tender pasta.
Season the mixture with 1.5 teaspoons salt, 0.5 teaspoon black pepper, 0.5 teaspoon garlic powder, and 0.5 teaspoon onion powder. Stir well to distribute the seasonings evenly. The noodles should be fully submerged in the sauce, and the mixture should look like a thick, creamy batter. If it appears too thick, whisk in 2-3 tablespoons of heavy whipping cream to loosen it slightly.
Create the Crispy Topping Layer
In a small bowl, combine the 0.5 cup panko breadcrumbs, 0.25 cup chopped fresh parsley, and any remaining 0.5 teaspoon black pepper. Sprinkle this mixture evenly over the top of the mac and cheese in the skillet. The panko will create a golden, crispy crust while adding texture contrast to the creamy base.
For extra richness, drizzle the 0.5 cup heavy whipping cream evenly over the top layer. This adds an additional layer of creaminess and helps create a luscious finish. The cream will melt into the cheese mixture as it bakes, enhancing the overall texture.
Bake to Golden Perfection
Transfer the skillet to a preheated 375°F oven and bake for 25-30 minutes. The mac and cheese is done when the top is golden brown and the edges are bubbling. You'll know it's ready when the cheese is fully melted and the noodles are tender throughout—no need for a fork test since they cooked directly in the sauce.
Remove from the oven and let it rest for 5 minutes before serving. This resting period allows the layers to set slightly, making it easier to slice and preventing a runny texture. The crispy panko topping will be firm enough to handle, while the interior remains creamy and velvety.
Pro Tips For Making Baked Mac And Cheese Recipe Without Boiling Noodles
- Dry the pasta first: Toss uncooked elbow macaroni in a dry skillet over medium heat for 3-4 minutes until lightly toasted—this prevents a gummy texture later. I learned this the hard way after making a batch that turned out sticky no matter how long I baked it.
- Shred cheese coarsely: Use a box grater for sharp cheddar and Gruyère, not a food processor—smaller shreds melt faster and make the sauce grainy. My grandmother swore by this, and she was right: the texture stays smooth even when baked.
- Mix cream cheese last: Stir in the cream cheese only after the other cheeses have melted into the cream—adding it too early makes the sauce split. Sounds weird, but it works: the final sauce stays velvety instead of breaking.
- Bake uncovered first: Let the mac and cheese bake uncovered for the first 10 minutes at 375°F—this helps the top set before adding foil to melt the cheese fully. I skip this when I'm lazy, but the dish is noticeably better when I don’t.
Creative variations of these flavors
Spicy Southwest Twist
Transform this classic into a bold, smoky dish by adding 1 tbsp chipotle powder and ½ tsp smoked paprika to the cheese sauce. Stir in ½ cup black beans (rinsed) with the noodles, and top with ¼ cup diced jalapeños and 2 tbsp sour cream before baking.
The heat from the chipotle balances perfectly with the creamy cheese, while the black beans add hearty texture. Serve with extra hot sauce on the side—I love Cholula for its tangy kick. 🌶️
Lobster Luxe Version
Elevate this dish for a special occasion by adding 12 oz cooked lobster meat (chopped) to the noodles in Step 2. Fold it in gently so it distributes evenly. Top with ¼ cup grated Parmesan and 2 tbsp chopped chives before baking.
The sweetness of lobster pairs beautifully with the sharp cheddar, creating a restaurant-worthy centerpiece. I’ve made this for Mother’s Day brunches—it’s always a crowd-pleaser! 🦞
Vegetarian Powerhouse
Swap the chicken broth for vegetable broth and add 1 cup roasted butternut squash cubes (tossed with 1 tsp olive oil and ½ tsp cinnamon) to the noodles. Stir in ½ cup walnuts (toasted and chopped) for crunch.
The squash adds natural sweetness, while the walnuts bring a nutty depth that complements the cheese perfectly. This version is packed with flavor and texture without any meat. 🌱
Breakfast Mac and Cheese
Turn this into a brunch star by stirring in 4 scrambled eggs (cooked and chopped) with the noodles in Step 2. Top with ¼ cup shredded cheddar and 2 tbsp chopped chives before baking. Add a dash of ½ tsp cayenne pepper for a little heat.
Serve with a side of crispy hash browns or a simple avocado salad. This version is hearty enough for dinner but feels special enough for brunch. 🍳
Kid-Friendly Fun Toppings
Make this dish extra appealing for picky eaters by offering a toppings bar with crushed potato chips, mini marshmallows, and extra shredded cheese.
Let kids customize their own portions—it’s a great way to get them excited about eating veggies if you sneak in some finely chopped broccoli into the sauce. I’ve used this trick with Lily, and it works like magic. 🧸
Meal Prep Hack
For easy prep, assemble the mac and cheese in individual ramekins or small baking dishes (about 6 oz each) before baking. Portion the cheese sauce, noodles, and toppings evenly, then bake at 375°F for 20-25 minutes.
These reheat beautifully—just cover with foil and warm in the microwave for 2-3 minutes or in the oven for 10 minutes. Perfect for lunches or quick dinners during the week. 📅
Nutrition facts
Frequently asked questions
Why doesn't this recipe require boiling the noodles first?
The noodles cook directly in the flavorful broth and cheese sauce during baking, absorbing all the liquid and becoming tender without pre-boiling. This method creates a more cohesive texture where the sauce perfectly coats each noodle. The key is using enough liquid (broth + cream) to fully submerge the pasta while baking.
Can I use any pasta shape instead of elbow macaroni?
Elbow macaroni works best because its shape holds the sauce well, but you can use penne or fusilli in a pinch. Avoid long noodles like spaghetti—they'll get tangled and won't absorb sauce evenly. For best results, stick to medium-sized shapes that can nestle together in the baking dish.
What if my mac and cheese comes out too dry or crumbly?
This usually happens if the sauce thickens too much before baking. To fix it, whisk in 2-3 tablespoons of heavy cream or milk after removing the pan from heat but before adding the noodles. If it's already baked, cover with foil and let it rest for 5-10 minutes—the residual heat will redistribute the moisture.
How do I make this recipe gluten-free?
Use gluten-free elbow macaroni (like Barilla or Jovial) and replace the all-purpose flour with 2 tablespoons cornstarch for thickening. The panko topping should be gluten-free breadcrumbs, and check your broth for gluten. The texture will be slightly different but still delicious—just expect the noodles to be a bit firmer.
Can I prepare this ahead of time for a dinner party?
Yes! Assemble everything in the baking dish up to the breadcrumb topping, then refrigerate for up to 24 hours. When ready to bake, cover with foil and bake at 375°F for 30-35 minutes (5-10 minutes longer than fresh). For a crowd, double the recipe and bake in two dishes—it scales perfectly for 8-10 servings.