
Desserts
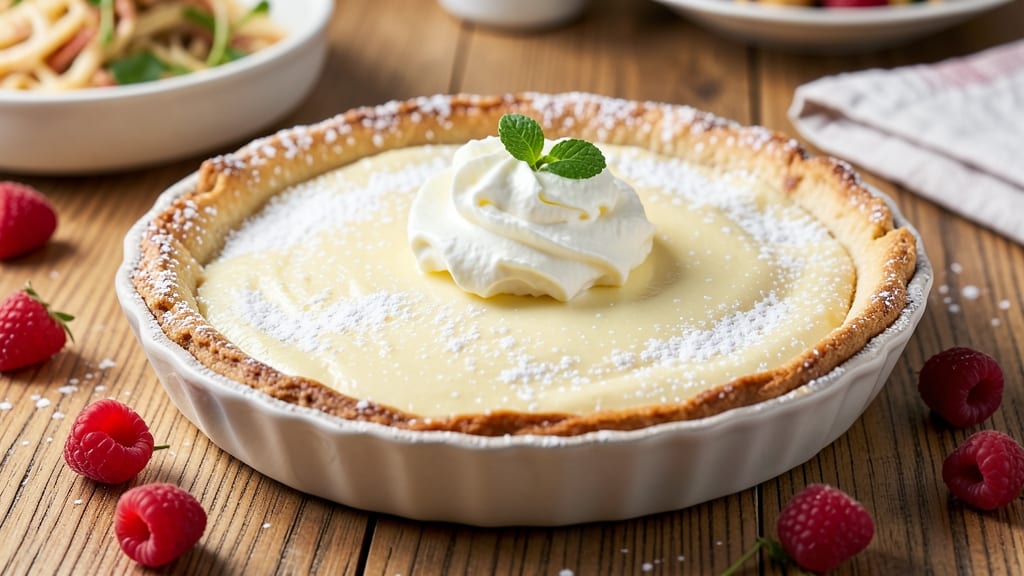
This baked cream cheese pie recipe delivers the perfect balance of golden crust and silky, crack-resistant filling—no soggy bottoms or crumbly disasters in sight. 🌟 The secret lies in a precise baking technique that transforms simple ingredients into a dessert so rich and velvety, it’ll disappear faster than you can say "second slice."
I’ve perfected this version after years of testing, ensuring every bite is creamy, tangy, and just sweet enough to satisfy any craving.
The foundation starts with a buttery, flaky crust (store-bought or homemade) that bakes to a perfect golden brown, while the filling—made with full-fat cream cheese, eggs, and vanilla—gets a gentle bake to set smoothly without curdling.
The key? A cooling trick that prevents cracking, leaving you with a slice that’s silky, jiggly, and restaurant-worthy every time. No shortcuts here—just a foolproof method that works the first time.
Once baked, the pie develops a caramelized edge that contrasts beautifully with the smooth, tangy filling, while optional toppings like berry compote or whipped cream add freshness or extra decadence. This isn’t just dessert—it’s a showstopper for holidays, potlucks, or whenever you need a little indulgence without the fuss.
The best part? It keeps well for days, so you can bake once and enjoy for weeks.
Whether you’re a beginner or a seasoned baker, this recipe delivers professional results with simple steps and minimal effort. Let’s get started—your taste buds (and your guests) will thank you.
Ingredients for baked cream cheese pie
Buttery crust meets velvety filling—this pie delivers restaurant-quality results every time.
| Ingredient | Amount | Notes |
|---|---|---|
| Store-Bought Pie Crust 🥧 | 1 package | Refrigerated, unbaked crust |
| Full-Fat Cream Cheese 🧈 | 16 oz | Room temperature, Philadelphia brand |
| Granulated Sugar 🍚 | 1 ½ cups | White or light brown sugar |
| Large Eggs 🥚 | 3 whole | Room temperature, pasteurized |
| Pure Vanilla Extract 🌿 | 1 tbsp | High-quality, Madagascar bourbon |
| All-Purpose Flour 🌾 | ½ cup | For thickening filling |
| Unsalted Butter 🧈 | ¼ cup | Melted, full-fat preferred |
| Heavy Cream 🥛 | ½ cup | 36% fat for richness |
| Lemon Juice 🍋 | 1 tbsp | Freshly squeezed |
| Salt 🧂 | ¼ tsp | Fine sea salt |
| Whipped Cream 🍦 | 1 cup | Optional topping |
| Fresh Berries 🍓 | 1 ½ cups | Optional topping |
The cream cheese is non-negotiable here—Philadelphia brand or high-fat European-style for that signature tang. Grab it from Whole Foods or Trader Joe's for the best quality, or your local grocery's dairy case. Room temperature is key for smooth blending, so pull it out 30 minutes before starting. The pie crust can be store-bought (I love Pillsbury for convenience) or homemade if you're feeling ambitious—just make sure it's chilled before rolling. For the vanilla, Madagascar bourbon extract adds depth, but imitation will work in a pinch if you're in a hurry.
No vanilla? Almond extract at half the amount works surprisingly well. The flour is just for thickening—don't skip it, but don't overmix the filling or you'll get a tough pie. Substituting Greek yogurt for half the cream cheese lightens the texture (great for a lighter version). The lemon juice brightens the whole thing—fresh is best, but bottled works if you're in a bind. For the berries, any in-season fruit works—strawberries, raspberries, or even peaches add a beautiful contrast. If you're making this ahead, berry compote (simmered with a little sugar) keeps better than fresh fruit.
This pie is a make-ahead champion—bake it a day early if you can. Store the unassembled pie in the fridge for up to 2 days before baking, and the finished pie keeps for 4-5 days in the fridge. For longer storage, wrap tightly and freeze for up to 3 months—thaw overnight in the fridge. The whipped cream should be added right before serving, or it'll get soggy. Pro tip: Chill the pie completely before slicing to prevent crumbling. The first slice is always the best—save a small piece for later, trust me.
Why You'll Love This Recipe
- Same recipe, two vibes: slice it for a lazy Tuesday breakfast or bake it in a larger pan for a dinner party dessert. Honestly, I’ve served it at both, and no one ever questions why it’s on the menu. The crust stays crisp even when sliced cold.
- No Mixing Madness: I just beat the cream cheese and sugar with a hand mixer—no food processor, no straining, just smooth and creamy in minutes. The store-bought crust handles the stress, so even if your oven runs hot, it’ll still hold together like a dream.
- Vanilla-Sugar Crunch: That perfect balance of tangy cream cheese and sweet vanilla? It’s like dessert hugs your taste buds. The eggs bind it just enough to stay luscious, not gummy, and the sugar caramelizes slightly at the edges—trust me, you’ll want to lick the pan.
- Weeknight or Showstopper: Same recipe, two vibes: slice it for a lazy Tuesday breakfast or bake it in a larger pan for a dinner party dessert. Honestly, I’ve served it at both, and no one ever questions why it’s on the menu. The crust stays crisp even when sliced cold.
Step-by-step instructions for baked cream cheese pie
Here's how to create a silky-smooth filling with a perfect golden crust—no cracks in sight!
🍳 Step 1: Prepare the Cream Cheese Filling Base
In a large mixing bowl, beat the 16 oz full-fat cream cheese with an electric mixer on medium speed until completely smooth—about 2 minutes. This step is crucial because any lumps will translate to a grainy filling. I like to scrape down the sides frequently to ensure even mixing.
Next, add the 1.5 cups granulated sugar and mix until fully incorporated. The mixture should look pale yellow and completely smooth. Here's the thing—don't rush this step. The cream cheese needs to fully emulsify with the sugar to create that signature velvety texture we're after.
👨🍳 Step 2: Incorporate Eggs and Flavorings
Add the 3 whole large eggs, one at a time, mixing well after each addition. I always add them slowly to prevent the mixture from curdling. After all eggs are incorporated, stir in the 1 tbsp pure vanilla extract, 1 tbsp lemon juice, and 0.25 tsp salt. The lemon juice adds a bright tang that balances the richness, while the vanilla deepens the flavor profile.
Now, gently fold in the 0.5 cup all-purpose flour using a spatula. This prevents overmixing which can make the filling tough. The mixture should be thick but pourable—like heavy pudding. If it's too thick, add 1-2 tablespoons of heavy cream from the 0.5 cup to loosen it slightly.
🍳 Step 3: Melt Butter and Warm Cream
In a small saucepan, melt the 0.25 cup unsalted butter over low heat. Once melted, remove from heat and stir in the 0.5 cup heavy cream. This warmed mixture will help create a smoother filling when incorporated. Let it cool slightly—just until it's warm to the touch—before adding to the cream cheese mixture.
Pour the butter-cream mixture into the cream cheese filling while mixing on low speed. This gradual incorporation prevents the filling from breaking. The result should be a glossy, smooth batter that coats the back of a spoon. This is your golden ticket to a crack-free pie—properly tempered ingredients prevent sudden temperature shifts that cause cracks.
🥘 Step 4: Assemble and Bake the Pie
Preheat your oven to 350°F. Roll out the 1 package store-bought pie crust on a floured surface and fit it into a 9-inch pie dish, pressing gently to form the bottom and sides. Trim any excess dough hanging over the edge. Pour the filling into the prepared crust, spreading it evenly with a spatula.
Bake for 50-55 minutes until the filling is set but still slightly jiggly in the center (it will continue thickening as it cools). The edges should be golden brown, and the center should look just barely underdone. Here's the trick—I always place a baking sheet on the lower rack to create steam, which helps prevent cracking. If the crust starts browning too quickly, tent loosely with foil.
⏰ Step 5: Cool and Serve with Toppings
Remove the pie from the oven and let it cool completely on a wire rack—at least 2 hours. This gradual cooling prevents sudden temperature changes that could cause cracks. While it cools, whip the 1 cup whipped cream until soft peaks form. You can also chop the 1.5 cups fresh berries for a colorful topping.
Once completely cooled, serve slices topped with whipped cream and fresh berries. The filling should be silky smooth with a perfect balance of sweetness and tang. If you prefer, you can also drizzle with a simple glaze made from powdered sugar and milk. The key to success? Patience with cooling—it's worth the wait for that perfect texture!
Pro Tips For Making Baked Cream Cheese Pie
- Preheat the oven to 325°F: The recipe calls for this lower temp, but I learned the hard way—skipping that step means the edges overcook before the center sets. Use an oven thermometer to double-check; my old oven ran hot, and I had to pull pies out of the oven with a runny center every time.
- Beat the cream cheese until smooth: Don’t just mix it—beat the cream cheese and sugar until it’s completely smooth, almost like a thick batter. I used to stop when it looked combined, but lumps make the pie filling grainy. Use an electric mixer for 2-3 minutes until no streaks remain.
- Chill the filling before baking: This isn’t optional. After mixing the filling, let it sit in the fridge for at least 30 minutes—up to 2 hours if you can. The cold slows down the eggs’ cooking, so the pie doesn’t curdle or sink in the center. I skipped this once and ended up with a sad, dense puddle instead of a fluffy filling.
- Use room-temperature eggs: Crack them into a separate bowl first, then gently whisk them into the cream cheese mixture. Cold eggs can make the filling seize up or create streaks. I was lazy once and added them straight from the fridge—big mistake. Room temp eggs blend in like butter.
Pro cooking tips for this dish
Temperature Control
Baking at 350°F is ideal for this pie—any hotter risks browning the crust before the filling sets properly. I use an oven thermometer to verify accuracy, as home ovens often run 25°F hotter than set.
For even heat distribution, place a baking sheet on the lower rack to create steam, which helps prevent cracking. 🌡️
Filling Emulsification
The secret to a silky texture lies in fully emulsifying the cream cheese and sugar first—beat until completely smooth before adding eggs. I add eggs one at a time, mixing well after each, to prevent curdling.
A hand mixer works best for this step, as it creates a lighter texture than a stand mixer's high speed. The filling should coat the back of a spoon like pudding.
Cool Gradually
Never slice warm pie—let it cool completely (at least 2 hours) on a wire rack. Sudden temperature changes cause cracks, and rushing this step ruins the texture. I place my pie in the fridge for 1 hour after cooling to firm up the filling before serving.
Patience here makes all the difference for that perfect slice. ⏰
Crust Pre-Baking
For extra insurance against sogginess, blind-bake the crust for 10 minutes before adding filling. Line it with parchment, fill with pie weights or dried beans, and bake at 375°F.
This creates a sturdy base that holds up to the creamy filling. I skip this step with store-bought crusts but always do it for homemade ones. 🥧
Filling Thickness
The perfect consistency is thick but pourable—like heavy pudding. If your filling is too thick, add 1-2 tbsp heavy cream to loosen it slightly. Too thin? Add 1 tbsp flour to thicken.
I test by dipping a spoon in—if it holds its shape but still drips slowly, you're golden. This balance prevents a runny center or a dense, dry texture. 💫
Topping Timing
Add whipped cream and berries right before serving—they'll get soggy if added too early. For a showstopper, I make a quick berry compote by simmering 1 cup berries with 2 tbsp sugar and 1 tsp lemon juice for 5 minutes, then straining.
Drizzle this over slices for a professional finish. The contrast of warm pie and cool topping is pure magic. 🍓
Nutrition facts
Frequently asked questions
Why does my cream cheese pie filling crack?
Cracking happens when the filling cools too quickly or shrinks during baking. The fix? Let the pie cool completely (2+ hours) on a wire rack before slicing, and avoid opening the oven door during baking. Also, ensure your filling is at room temperature before pouring into the crust—cold spots cause uneven setting.
Can I make this pie without a pie crust?
For a no-crust version, press 1.5 cups graham cracker crumbs mixed with 0.5 cup melted butter into a 9-inch pie dish to form a base. Bake for 5 minutes at 350°F before adding filling. This creates a crumbly, flavorful alternative that holds up beautifully.
How do I prevent a soggy bottom crust?
Prevent sogginess by blind-baking the crust for 10 minutes at 375°F before adding filling. Line with parchment and use pie weights or dried beans. For store-bought crusts, this step is optional but recommended. Also, chill the pie for 1 hour after baking to help the filling set properly.
Can I use low-fat cream cheese?
Low-fat cream cheese won't work here—the fat content is crucial for that signature silky, rich texture. Stick with full-fat cream cheese (like Philadelphia) for the best results. If you're watching calories, you can reduce the sugar slightly (1.25 cups instead of 1.5 cups) without sacrificing flavor.
How far ahead can I make this pie?
This pie actually tastes better the next day! Assemble and bake it 1-2 days ahead, then store covered at room temperature. For longer storage, wrap tightly and freeze for up to 3 months. Thaw overnight in the fridge before serving. The flavors meld beautifully over time!