
Salads
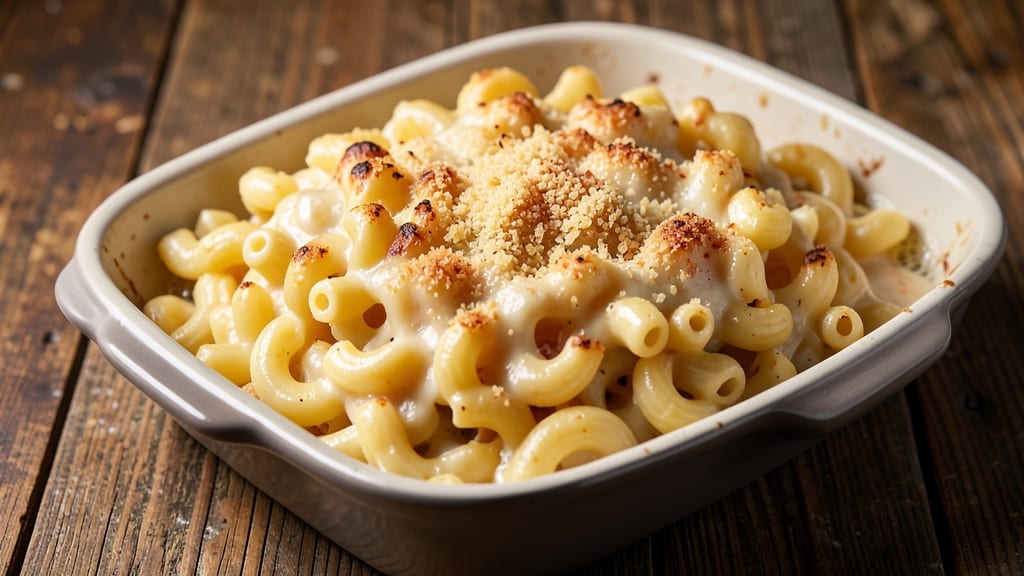
This American style macaroni and cheese recipe delivers the ultimate comfort food experience with its signature crispy breadcrumb crown and rivers of melty cheddar. The secret lies in a perfectly balanced cheese sauce that clings to every noodle while maintaining a creamy, velvety texture.
I've refined this recipe over years of testing, ensuring the breadcrumbs achieve that satisfying crunch without burning, and the cheese sauce remains luscious rather than greasy.
What sets this mac and cheese apart is the three-cheese blend—sharp cheddar for classic flavor, Gruyère for nutty depth, and cream cheese for that signature creaminess. The sauce starts with a proper roux, cooked low and slow to develop rich, nutty flavors before being enriched with milk and cheese.
This foundational technique ensures your sauce will hold together beautifully, even when reheated.
The baking process transforms this dish into something restaurant-worthy. As the macaroni bakes, the breadcrumb topping turns golden and crispy, while the cheese sauce bubbles and browns slightly at the edges.
Each bite delivers that perfect contrast—crunchy crown giving way to tender pasta and molten cheese. The aroma alone will have everyone gathering around the table.
This recipe serves six and comes together in about 45 minutes, making it ideal for weeknight dinners or holiday gatherings. Whether you're a seasoned cook or new to the kitchen, this mac and cheese delivers foolproof results every time. Let's get started on creating your new favorite comfort dish.
Ingredients for american style macaroni and cheese
Pantry staples plus three cheeses that make this mac and cheese restaurant-worthy.
| Ingredient | Amount | Notes |
|---|---|---|
| Elbow Macaroni 🍝 | 1 ½ lb | Medium or small elbow shape |
| Sharp Cheddar Cheese 🧀 | 2 cups | Shredded, 2-year aged preferred |
| Gruyère Cheese 🧀 | ¾ cup | Shredded, nutty flavor |
| Cream Cheese 🧀 | 8 oz | Full-fat, room temperature |
| Unsalted Butter 🧈 | ½ cup | Cold, cubed for roux |
| All-Purpose Flour 🌾 | ¼ cup | For roux, sifted |
| Whole Milk 🥛 | 2 cups | Warm for smooth sauce |
| Panko Breadcrumbs 🍞 | ¾ cup | For crispy crown |
| Parmesan Cheese 🧀 | ¼ cup | Freshly grated, fine |
| Dried Mustard 🌶️ | ½ tsp | For subtle tang |
| Garlic Powder 🧄 | ½ tsp | Freshly ground preferred |
| Salt 🧂 | 1 ½ tsp | Kosher or sea salt |
| Black Pepper 🌶️ | ½ tsp | Freshly cracked |
| Extra-Virgin Olive Oil 🫒 | 1 tbsp | For greasing baking dish |
The cheeses are non-negotiable here. Sharp cheddar gives that classic tang, but the Gruyère adds nutty depth—don't skip it. I grab mine from Whole Foods or Trader Joe's since they carry the good stuff. For the cheddar, look for blocks labeled '2-year aged' or older—they've got that perfect sharpness. The cream cheese? Full-fat is a must—low-fat versions never melt right. Panko breadcrumbs are your friend for that crispy crown—no fine breadcrumbs here. The macaroni? Medium elbow shape works best, but small elbow is fine too.
No Gruyère? Extra-sharp white cheddar can stand in, though it won't be as nutty. Running out of panko? Toasted breadcrumbs work too—just pulse them in a food processor for a finer texture. The dried mustard adds a subtle tang that balances the richness—if you've got fresh mustard, use half the amount. For the roux, don't rush it. Cook the butter and flour low and slow until it's a deep golden color—about 10 minutes. That's what gives the sauce that rich, nutty flavor. And if you're in a pinch, half-and-half can replace the milk, though it'll be slightly lighter.
This keeps beautifully—3-4 days in the fridge, covered tightly. For leftovers, reheat in the oven at 350°F for 15 minutes to revive that crispy crown. I always double the breadcrumb topping because it gets devoured first. The sauce thickens as it cools, so if it looks too thick when you're done, just whisk in a splash of warm milk. And trust me, the first bite out of the oven is worth the wait—molten cheese, crispy topping, the whole experience.
Why You'll Love This Recipe
- One-Pot Magic: I swear by this method—just toss everything into one pot, stir, and let the cheeses melt together. No extra bowls, no fuss, and the elbow pasta cooks right in the creamy sauce. (Yes, even on a Tuesday night when I’m exhausted.)
- Creamy Crunch Combo: That sharp cheddar and Gruyère blend gives it a sharp, nutty depth, while the cream cheese keeps it velvety smooth. The butter? It’s the secret—it rounds out the flavors so every bite feels rich and satisfying.
- Lunchbox Hero: Between us, this is my go-to for meal prep. The leftovers stay creamy (not dry or sad) for days, and it’s the kind of dish that makes kids actually want their lunch. Pack it cold or reheat it—either way, it’s a win.
- Budget Stretch: Honestly, I make this all the time because it’s ridiculously affordable. A block of cheddar, a little Gruyère for flavor, and cream cheese stretch the sauce further than store-bought mixes. Plus, elbow macaroni is cheap—no excuses.
Step-by-step instructions for American style macaroni and cheese
Here's how to make the ultimate comfort food with melty cheese and a perfect crispy crown.
Cook the Elbow Macaroni to Al Dente Perfection
Bring a large pot of water to a rolling boil and add 1.5 lb elbow macaroni. Stir immediately to prevent sticking. Cook until 1 minute before the package instructions for al dente—you want it slightly firm so it holds up to the cheese sauce. Drain thoroughly in a colander, shaking to remove excess water.
I like to rinse the pasta briefly under cold water to stop the cooking process completely. This prevents the macaroni from becoming mushy when mixed with the hot cheese sauce. Drain again well and set aside in a large bowl.
Make the Ultimate Creamy Cheese Sauce
In a separate large pot, melt 0.5 cup unsalted butter over medium heat. Whisk in 0.25 cup all-purpose flour to form a roux, cooking for 1-2 minutes until golden and bubbly. Slowly pour in 2 cups warm whole milk, whisking constantly to prevent lumps.
Add 2 cups sharp cheddar cheese, 0.75 cup gruyère cheese, and 8 oz cream cheese all at once. Stir until completely melted and smooth—this should take about 3-4 minutes. Remove from heat and season with 0.5 tsp dried mustard, 0.5 tsp garlic powder, 1.5 tsp salt, and 0.5 tsp black pepper.
Combine Pasta and Cheese Sauce
Pour the hot cheese sauce over the drained macaroni in the bowl. Stir gently but thoroughly to coat every noodle evenly. The mixture will look thick and luxurious—this is exactly what we want. Taste and adjust seasoning if needed, adding more salt or pepper as necessary.
Here's the thing—don't worry if it looks too thick. The sauce will loosen up as it sits and absorbs into the pasta. Cover the bowl with plastic wrap and let it sit for 5 minutes while you prepare the breadcrumb crown.
Assemble with the Crispy Breadcrumb Crown
Preheat your oven to 375°F. Lightly grease a 9x13-inch baking dish with 1 tbsp extra-virgin olive oil. Transfer the macaroni and cheese mixture to the prepared dish, spreading it evenly.
In a small bowl, mix together 0.75 cup panko breadcrumbs and 0.25 cup parmesan cheese. Sprinkle this mixture evenly over the top of the macaroni and cheese, pressing down gently to help it adhere. The crown should be about ¼-inch thick all over.
Bake Until Golden and Bubbly
Bake for 20-25 minutes until the top is deep golden brown and the edges are bubbling. You want that crown to be crispy while keeping the cheese underneath perfectly melty. If it browns too quickly, tent loosely with foil for the last 5 minutes.
Let the macaroni and cheese rest for 5 minutes before serving—this allows the cheese to set slightly and makes it easier to slice. The crown should be crisp enough to hold its shape, while the cheese underneath remains creamy and stretchy. Serve immediately with a side of buttery corn or a simple green salad.
Pro Tips For Making American Style Macaroni And Cheese
- MELT CHEESE LOW AND SLOW: I learned this the hard way—rushing the cheese sauce on high heat turns it grainy. Once the butter’s melted, reduce heat to medium-low and let the cheeses (especially the Gruyère) melt into the cream cheese gradually. Stirring constantly isn’t just busywork; it’s how you avoid lumps and get that velvety texture.
- GRATE CHEESE FINE: Sharp cheddar and Gruyère have big crystals that won’t melt smoothly. Use the large holes of a box grater (or pulse in a food processor) and skip the pre-shredded stuff—it’s coated with anti-caking agents that make the sauce clump. Trust me, your future self will notice the difference when the cheese blends like butter.
- SALT THE PASTA WATER: The pasta’s flavor starts in the water. Add a full tablespoon of salt to the boiling pot before the macaroni goes in—no need to adjust later. If you’re using unsalted butter in the cheese sauce, this step keeps the whole dish from tasting bland. (Yes, even if you’re impatient like me.)
- TOAST THE PASTA DRY: Drain the macaroni, then spread it on a rimmed baking sheet and let it sit for 3–5 minutes. The residual steam evaporates, giving you pasta that’s actually dry when it hits the cheese sauce. This isn’t the prettiest method, but it’s the thing that makes the final dish creamy—not soggy.
Essential equipment for this dish
Roux Pot Essentials
For your cheese sauce, a heavy-bottomed saucepan is non-negotiable—I use my All-Clad Stainless Steel 3-quart because it distributes heat evenly and prevents scorching. The sauce will reach 170°F, so you need a pot that maintains consistent temperature without hot spots.
Avoid thin, lightweight pans—they'll cause uneven cooking and potential lumps in your sauce. 🔥
Cheese Grater Must-Have
Freshly grated cheese makes all the difference. My go-to is the Microplane 4-in-1 Grater—it handles hard cheeses like Gruyère and cheddar beautifully while keeping the texture fine. For the Parmesan, I use the Box Grater attachment to get those fine, powdery shavings that cling perfectly to the breadcrumbs.
Pre-shredded cheese? Skip it—it contains anti-caking agents that make the sauce grainy.
Baking Dish Size Matters
A 9x13-inch baking dish is ideal for this recipe, but don't use your "good" ceramic dish—opt for heavy-duty stainless steel or dark aluminum (like Wilton Professional). These materials conduct heat better and create that perfect Maillard reaction on the breadcrumb crown.
If you're short on space, a 9x9-inch square dish works too, but reduce baking time by 5-7 minutes to prevent over-browning.
Breadcrumbs: Panko vs. Toasted
Panko breadcrumbs are your best friend for that signature crispy texture—they're light and fluffy, creating air pockets that toast beautifully. For extra insurance, I pulse stale bread in a food processor until finely ground, then toast it in a dry pan for 3-4 minutes until golden. Store-bought panko works fine, but homemade gives you control over freshness and texture. Keep an extra ½ cup on hand—it disappears fast!
Temperature Tools
While not strictly necessary, an instant-read thermometer (like ThermoWorks Thermapen) gives you confidence in your baking. Check the internal temperature of the mac and cheese at 200°F—this ensures the cheese is fully melted but not overcooked.
For the breadcrumb crown, aim for 375°F in your oven. A oven thermometer (like Taylor Precision Products) is worth the investment if your oven runs hot or cold.
Mixing Bowls and Whisks
Use a large, deep mixing bowl (at least 8-quart capacity) to combine the pasta and cheese sauce—this prevents spills when stirring. A silicone spatula helps scrape every last bit of sauce from the bowl, ensuring no dry pasta remains.
For the roux, a balloon whisk (like OXO Good Grips) creates a silky-smooth sauce without lumps. Avoid metal whisks—they can scratch non-stick pans if you're using one.
Nutrition facts
Frequently asked questions
Can I make this mac and cheese stovetop instead of baking it?
For a stovetop version, cook the pasta and cheese sauce as directed, then stir in 0.5 cup panko and 0.25 cup parmesan at the end. Keep the heat at low-medium and stir constantly for 3-4 minutes until the breadcrumbs are golden and crispy. Cover with a lid for 2 minutes to let the cheese melt completely. The texture will be creamier without the crispy crown, but still delicious!
Why does my cheese sauce get grainy or separate?
Graininess usually means pre-shredded cheese (anti-caking agents cause this) or overheating the sauce. Always grate your own cheese and remove the pot from heat while stirring in the cheese. For separation, whisk constantly when adding milk to the roux and avoid boiling the sauce. If it happens, whisk in 1 tablespoon cold butter to restore smoothness.
Can I make this dish ahead of time?
Yes! Assemble the dish up to 24 hours ahead and refrigerate uncovered. When ready to bake, cover with foil and bake at 375°F for 25-30 minutes (add 5 minutes if coming from fridge). For the crispy crown, sprinkle fresh breadcrumbs and broil for 2-3 minutes at the end. The cheese may separate slightly when refrigerated—just whisk vigorously before baking.
What's the best way to reheat leftovers?
For best results, cover leftovers with foil and reheat at 350°F for 15-20 minutes until bubbly. To revive the crispy crown, broil for 1-2 minutes at the end. If using microwave, cover with a damp paper towel and heat in 30-second intervals, stirring between each. The sauce may thicken when cooled—add a splash of warm milk if needed.
Can I use different cheeses for this recipe?
For a smoky flavor, swap 0.5 cup cheddar with smoked Gouda. For extra creaminess, add 4 oz cream cheese or 0.5 cup sour cream. Avoid strong-flavored cheeses like blue cheese—they can overpower the dish. Always keep the ratio of cheddar to Gruyère similar (about 2:1) for that classic American mac and cheese balance.