
Breakfast & Brunch
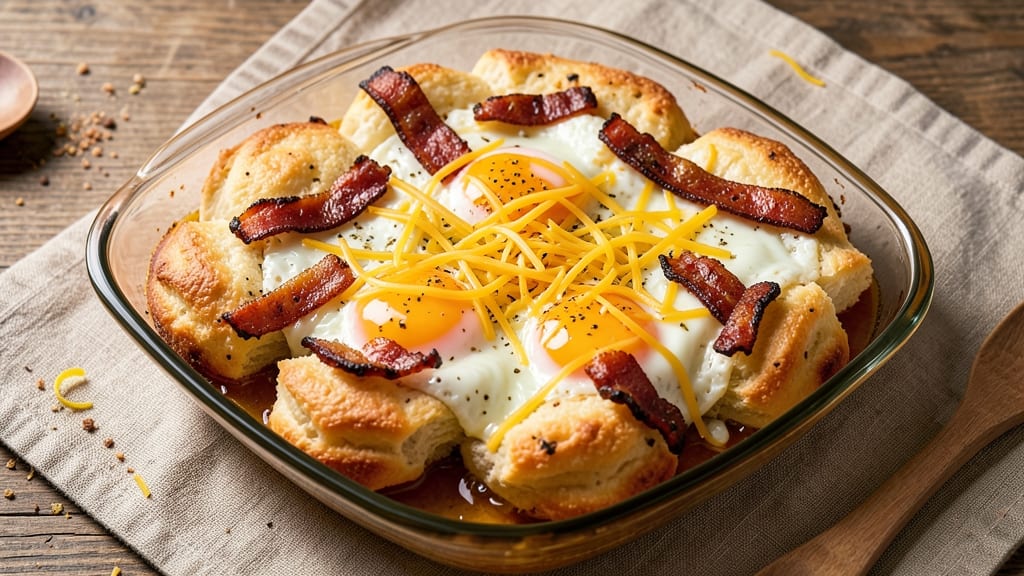
This bacon egg and cheese biscuit bake recipe delivers a hearty, one-pan breakfast that's ready in under an hour with minimal effort. The secret lies in layering crispy biscuits, savory bacon, and rich cheese with runny eggs—creating a textural masterpiece that's both satisfying and foolproof. I perfected this dish during a busy week when I needed a meal that could feed the whole family without stress.
The beauty of this recipe is its simplicity: no fancy techniques, just a few pantry staples and a single baking dish. The biscuits form a golden, crispy top that contrasts perfectly with the creamy eggs and melted cheese below.
Pre-cooked bacon adds smoky depth, while the eggs stay perfectly runny at the center—just how I like them. It's the kind of breakfast casserole that transforms a lazy morning into a cozy, filling meal.
What makes this dish truly special is how it comes together—layer by layer, flavor by flavor. The biscuits provide structure, the bacon adds richness, and the cheese ties everything together with a creamy, melty finish. The result?
A breakfast that's hearty enough for brunch but simple enough for a weeknight. Plus, with just 30 minutes of prep and 30 minutes in the oven, you'll have a crowd-pleasing meal without the fuss.
Serve it with a side of fresh fruit or a simple green salad to balance the richness. The leftovers reheat beautifully, making it perfect for meal prep. Let's get started—this breakfast casserole is about to become a staple in your morning routine.
Ingredients for bacon egg and cheese biscuit bake
Pantry staples plus a few key ingredients for a hearty, crispy-topped breakfast that feeds six.
| Ingredient | Amount | Notes |
|---|---|---|
| Bacon, Pre-Cooked 🥓 | 12 oz | Chopped into small pieces |
| Large Eggs 🥚 | 6 whole | Room temperature preferred |
| Shredded Sharp Cheddar Cheese 🧀 | 2 cups | Aged for best melt |
| Bisquick Biscuit Mix 🍞 | 1 ½ cups | Plus 1.5 cups milk |
| Whole Milk 🥛 | 1 ½ cups | Full-fat for creaminess |
| Butter, Unsalted 🧈 | ½ cup | Melted, for biscuit topping |
| Garlic Powder 🧄 | 1 tsp | For biscuit seasoning |
| Onion Powder 🧅 | 1 tsp | For biscuit seasoning |
| Salt 🧂 | 1 tsp | Diamond Crystal preferred |
| Black Pepper 🌶️ | ½ tsp | Freshly ground preferred |
| Fresh Chives 🌿 | 2 tbsp | Chopped, for garnish |
| Cooking Spray 🫧 | 1 tbsp | For greasing baking dish |
The bacon is non-negotiable here—it's what gives this dish that smoky depth. Oscar Mayer or Costco's Kirkland brand are my go-tos for pre-cooked bacon; they crisp up perfectly without burning. If you're using frozen bacon, thaw it first and pat it completely dry to avoid soggy biscuits. The cheese matters too—sharp cheddar melts beautifully and adds that tangy kick. I always grab a block and shred it myself at home; pre-shredded cheese has anti-caking agents that make it clump. For the biscuits, Bisquick is a game-changer because it's foolproof—no rolling or kneading required.
No pre-cooked bacon on hand? Cook your own bacon first and chop it into similar-sized pieces. Running short on sharp cheddar? Gruyère or Monterey Jack work in a pinch, though they melt differently. The Bisquick mix can be swapped for Pillsbury Grands if you prefer a flakier texture. Fresh chives are ideal, but dried chives at half the amount will do if you're in a hurry. Pro tip: measure your milk precisely—too much makes the biscuits gummy, too little makes them dry. The baking dish? Any oven-safe skillet that fits your stove works—Le Creuset or All-Clad if you're fancy, but a basic stainless steel pan does the job just fine.
This bake reheats like a dream—honestly tastes better the next day once everything melds together. Store leftovers covered in the fridge for up to 4 days, or freeze portions for 3 months. I like to portion it into individual servings before freezing so I can just grab and reheat. For meal prep, double the recipe and freeze half—perfect for lazy mornings. The biscuit topping stays crispy if you reheat it covered with foil for 5 minutes, then uncover for the last 2 minutes to crisp up again.
Why You'll Love This Recipe
- Two-Ingredient Magic: I swear by pre-cooked bacon here—no fussing with pans or grease splatter. Just crumble, mix, and bake. That’s it. Even my college apartment kitchen survived this.
- Crispy Cheese Obsession: The sharp cheddar gets just melty enough to stretch, while the biscuit crust stays golden and shatterable. Honestly, I’ll eat this straight from the pan—no judgment.
- Weeknight Crowd-Pleaser: Doubles easily for game days or lazy Sundays. My roommates always grab seconds, and it’s the only breakfast-for-dinner dish my picky dad won’t complain about.
- Leftovers That Don’t Suck: Unlike most casseroles, this stays crispy reheated—microwave or oven, no soggy bits. I stash portions in the fridge for grab-and-go mornings, and it’s still ridiculously good cold.
Step-by-step instructions for bacon egg and cheese biscuit bake
Here's how to assemble this hearty breakfast casserole with golden, crispy biscuit topping.
Preheat and Prepare the Baking Dish
Preheat your oven to 375°F. Lightly spray a 9x13-inch baking dish with the 1 tablespoon cooking spray and set aside. This ensures easy release later and prevents sticking during the long bake. I like to use a glass dish for even heat distribution, but any oven-safe dish will work.
While the oven heats, arrange the 12 oz pre-cooked bacon in an even layer across the bottom of the prepared dish. This creates the flavor base for the entire casserole. If your bacon is particularly greasy, drain it on paper towels first to prevent a soggy bottom layer.
Mix the Egg and Cheese Filling
In a large bowl, whisk together the 6 whole large eggs until the yolks and whites are fully combined. Add the 2 cups shredded sharp cheddar cheese and whisk until evenly distributed. The cheese should melt smoothly into the eggs, creating a creamy base.
Pour this egg-cheese mixture evenly over the bacon in the baking dish. The liquid should completely saturate the bacon pieces without pooling at the bottom. If needed, gently press down on the bacon with a spatula to help the mixture penetrate.
Prepare the Biscuit Topping
In a separate bowl, combine the 1.5 cups Bisquick biscuit mix, 1.5 cups whole milk, 1 tsp garlic powder, 1 tsp onion powder, 1 tsp salt, and 0.5 tsp black pepper. Stir just until combined—you want to maintain some lumps for a tender biscuit texture. The batter should be thick but spoonable.
Melt the 0.5 cup unsalted butter in the microwave for 30-45 seconds or on the stovetop over low heat. Stir the melted butter into the biscuit batter until fully incorporated. The butter adds richness and helps create that signature crispy top we're after.
Assemble and Bake the Casserole
Spoon the biscuit batter evenly over the egg mixture in the baking dish, spreading it to the edges. Use the back of a spoon to create a slightly textured surface—this helps the biscuit top brown more evenly. Sprinkle the 2 tbsp chopped fresh chives evenly over the top for freshness and color.
Bake in the preheated oven for 35-40 minutes until the biscuit topping is deep golden brown and the edges are set. The center should still be slightly soft—it'll continue cooking as it rests. Here's the thing—don't overbake. You want that biscuit top to be crispy on the outside while keeping the egg filling custardy inside.
Rest and Serve
Remove the casserole from the oven and let it rest for 5-10 minutes before serving. This resting period allows the filling to set slightly and makes it easier to slice. The biscuit topping will be crispy and golden, while the egg mixture underneath should be creamy with perfectly set curds.
Use a large spatula to cut into 6 equal portions and serve immediately. The bacon will be crispy, the eggs rich and custardy, and the biscuit topping will shatter deliciously with each bite. Store any leftovers covered in the refrigerator for up to 3 days, though I doubt you'll have any left!
Pro Tips For Making Bacon Egg And Cheese Biscuit Bake
- CRANK THE OVEN HIGH: The first 10 minutes at 425°F (220°C) is where the magic happens—biscuits rise fast and crisp up properly. After that, drop it to 375°F (190°C) to finish cooking evenly. I learned this the hard way when my first batch turned out flat and doughy.
- DRAIN AND PAT DRY: Pre-cooked bacon is your shortcut, but don’t skip draining it well and blotting with paper towels. Excess grease makes the biscuit mix soggy and dulls the bacon’s flavor—no one wants a greasy mess when you’re going for that crispy, cheesy bite.
- DON’T OVERMIX THE DOUGH: Stir the Bisquick, milk, and eggs just until combined—about 15 seconds. Overmixing develops the gluten, and your biscuits will turn out tough instead of flaky. Think "quick and loose," not "thoroughly blended."
- LAYER CHEESE LAST: Add the shredded cheddar after the biscuit dough goes in, pressing it lightly into the top. This keeps the cheese gooey and melty instead of getting absorbed into the dough. (Yes, even if it looks messy—it’s worth it.)
Serving suggestions for bacon egg and cheese biscuit bake
Classic Side Pairings
A simple fruit salad with seasonal berries or sliced peaches balances the richness beautifully. I love tossing 1 cup strawberries, 1 cup blueberries, and 1 cup diced peaches with a squeeze of lemon juice and a drizzle of honey.
The acidity cuts through the richness while adding freshness. 🍓
For a savory contrast, serve with a crisp green salad dressed in a tangy vinaigrette. Use 2 cups mixed greens, ½ cup cherry tomatoes, ¼ cup red onion, and ¼ cup crumbled feta.
Toss with 2 tablespoons olive oil, 1 tablespoon red wine vinegar, and a pinch of salt. The crunch and brightness complement the hearty casserole perfectly.
Beverage Recommendations
A bold black coffee or strong brewed tea is my go-to for balancing the richness of this dish. The caffeine helps cut through the grease, and the warmth pairs beautifully with the crispy biscuit topping. If you prefer something lighter, a sparkling water with lemon adds a refreshing contrast.
For a more indulgent pairing, a smooth, medium-bodied red wine like Pinot Noir or Merlot works surprisingly well. The fruit notes in the wine complement the bacon and cheese, while the tannins help cleanse the palate.
If you're serving this for brunch, a mimosa with fresh orange juice and chilled champagne adds a festive touch.
Garnishing for Extra Flavor
Add a sprinkle of crispy fried onions on top before serving for a sweet and crunchy contrast. I like to use ½ cup frozen fried onions from the grocery store—just heat them in a dry pan for 2-3 minutes until crispy.
The onions add texture and a subtle caramelized sweetness that elevates the dish.
For a fresh herb finish, top each serving with extra chopped chives or green onions. The bright, oniony flavor cuts through the richness, and it adds a pop of color that makes the dish look even more inviting.
A few drops of hot sauce on the side let guests add heat if they desire.
Make-Ahead Serving Tips
This casserole reheats beautifully, making it perfect for meal prep. Store leftovers in an airtight container in the fridge for up to 4 days.
To reheat, cover with foil and warm in the oven at 350°F for 15-20 minutes—this keeps the biscuit topping crispy while gently warming the filling.
For a crowd-pleasing presentation, serve family-style straight from the baking dish. The crispy edges and golden biscuit topping look stunning on a wooden board or large platter. Use a serrated knife to cut into neat squares, or serve with individual spatulas for self-serving at brunch gatherings.
Nutrition facts
Frequently asked questions
Can I make this recipe without pre-cooked bacon?
Yes, but you'll need to cook the bacon first. Cook 12 oz bacon in a skillet until crispy, then drain on paper towels and chop into small pieces. The key is to remove excess grease to prevent a soggy biscuit bottom—pat the bacon dry before adding it to the dish.
Why does my biscuit topping get soggy?
Soggy biscuits usually mean the egg mixture was too wet or the biscuit batter wasn't thick enough. Always drain bacon thoroughly and use full-fat milk for the biscuits. Also, make sure your baking dish isn't too large—9x13-inch is ideal. If needed, add 1-2 extra tablespoons of Bisquick mix to thicken the batter.
Can I use store-bought biscuits instead of making the topping?
Use 12 refrigerated biscuits (like Pillsbury Grands) for a shortcut. Arrange them on top of the egg mixture and brush with melted butter before baking. For extra crispiness, bake at 400°F for 15-20 minutes until golden brown, then reduce heat to 375°F and bake 15-20 more minutes to finish cooking the eggs.
How do I keep the eggs runny in the center?
Underbaking is key! Remove the casserole when the biscuit topping is golden but the center still jiggles slightly. The residual heat will finish cooking the edges while keeping the eggs custardy. For extra insurance, bake for 35 minutes at 375°F, then cover with foil and bake 5 more minutes before serving.
Can I make this dish ahead of time?
Yes, but assemble it just before baking. Store all components separately in the fridge for up to 24 hours, then assemble and bake as directed. For leftovers, refrigerate for up to 4 days and reheat covered at 350°F for 15-20 minutes—the biscuit topping stays crispy when reheated this way.